It can be extremely difficult to identify whose equipment is whose during a World War II living history event. The problem is often worsened by the fact that everyone's clothing and equipment looks similar, and there's often a lot of it kicking around during a display. This isn't a new problem, though, and was something that the average GI experienced regularly, both during training and in combat. The War Department realised early on during World War II that lost or misplaced clothing and equipment would prove an expensive mistake, and as such developed official regulations governing how each soldier should mark his clothing items and equipment to quickly and easily distinguish them from those of his buddies.

One example of a marking kit specially developed for adding indelible markings to uniform items and equipment. This particular example was made in 1944 by Mi-Marker Company, Marion, Kentucky.
(Author's Collection)
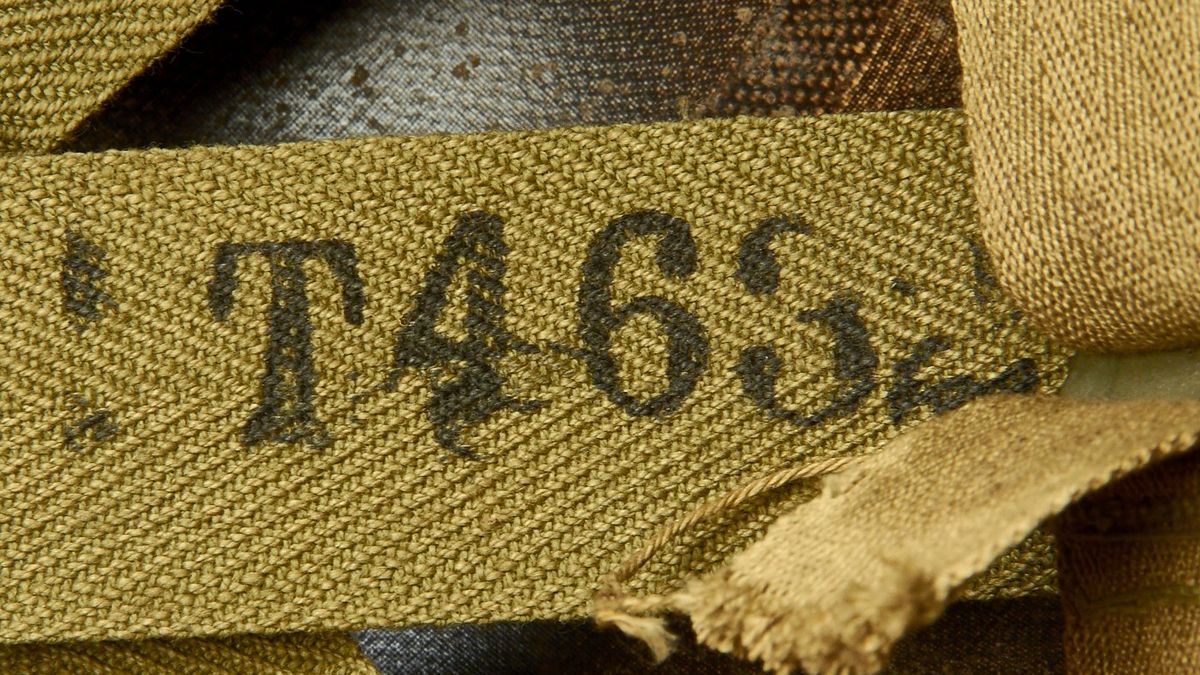
The War Department developed what would eventually become known as a "laundry number" which could be added to any item of individual issue by the soldier himself. This number was easy to remember, and sufficiently short to be added to all items of equipment and clothing that were issued to troops. It comprised the first initial of the soldier's surname, followed by the last 4 digits of his Army Serial Number. Of course in an Army of over 9 million troops, this laundry number was not unique to the individual, but it was deemed sufficiently unique to each soldier's unit so as to avoid confusion and misplaced or exchanged items.
Army Regulations AR 850-5, Marking of Clothing, Equipment, Vehicles and Property seems to be the first official document which introduces the notion of laundry numbers, as well as prescribing how each individual item of clothing and equipment should be marked. These Regulations also prescribe where markings should be applied, and which pieces of individual equipment were not to be marked. The following information has been taken from AR 850-5 (dated 5 August 1942).
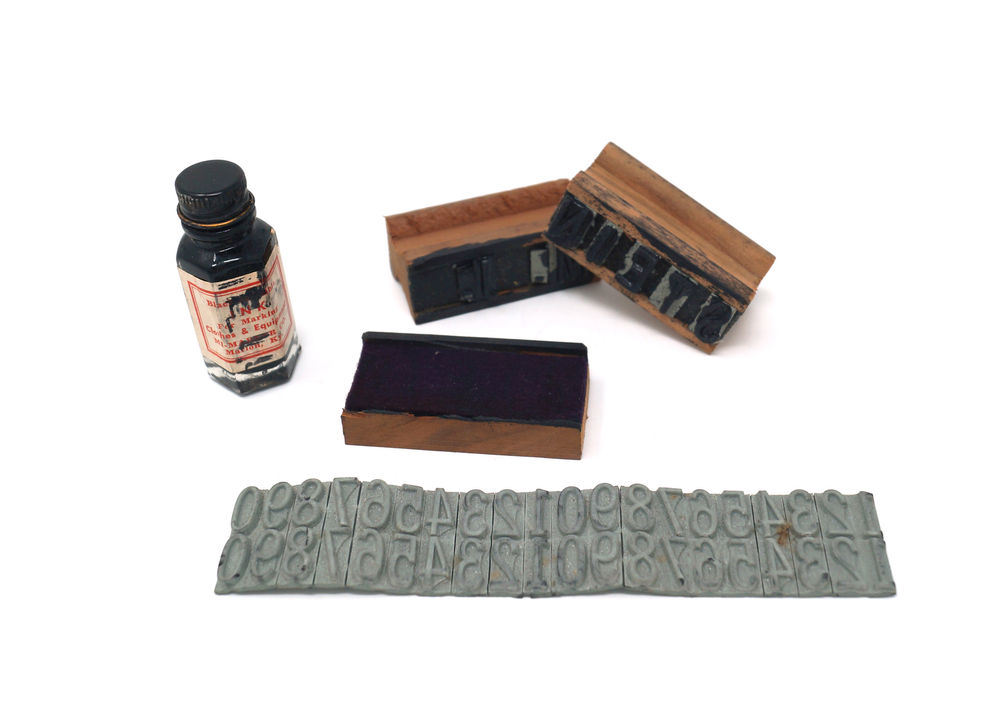
Contents of the Twin-Marker set, includes a bottle of indelible black ink, two hand self-adhesive hand stamps, an inking block and reusable rubber letters.
(Author's Collection)
Uniforms:
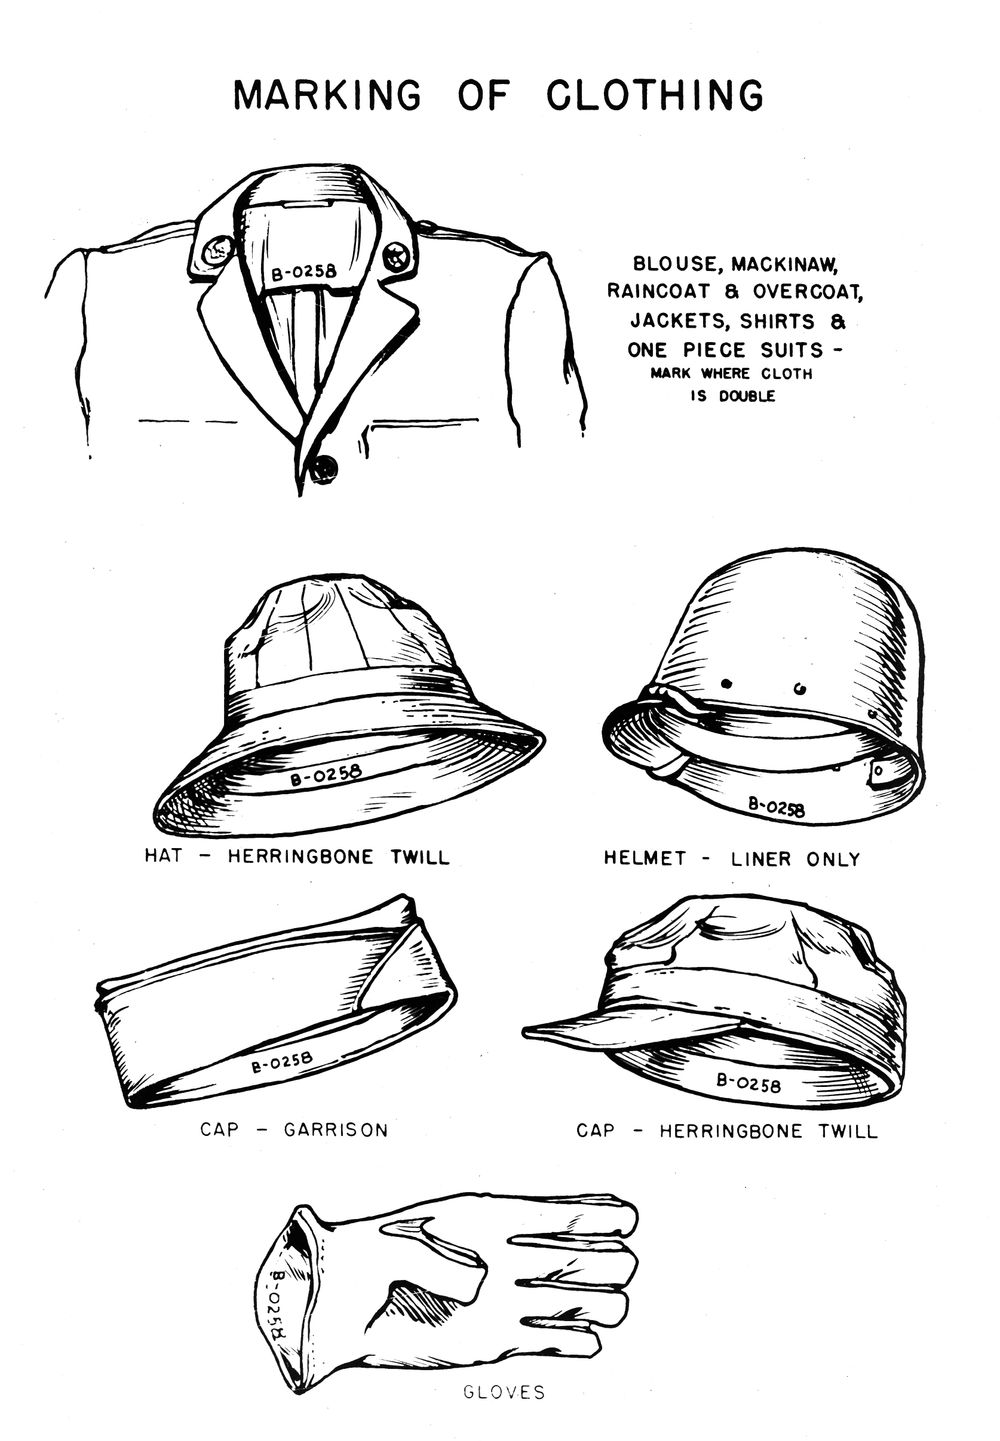
Marks required; where placed: Clothing will be marked on the inside of each garment with the initial letter of the enlisted man's last name, followed by a dash and the last four figures of the enlisted man's Army Serial Number, for example, W-6046.
To be indelible: The marking required by paragraph 1 will be done with indelible ink.
Equipment:
Articles not to be marked: Articles of individual equipment which will not be marked as prescribed below are:
- Metal articles which, when issued, have a serial number stamped thereon, for example, rifle and pistol.
- Batons
- Brassards, except Red Cross
- Bugles
- Canteens
- Covers of Cans, Meat
- Goggles
- Masks, Gas
- Packets, First-Aid
- Stands, Music
- Tags, Identification (See AR 600-40)
- Tapes, Steel
- Trumpets
- Whistles
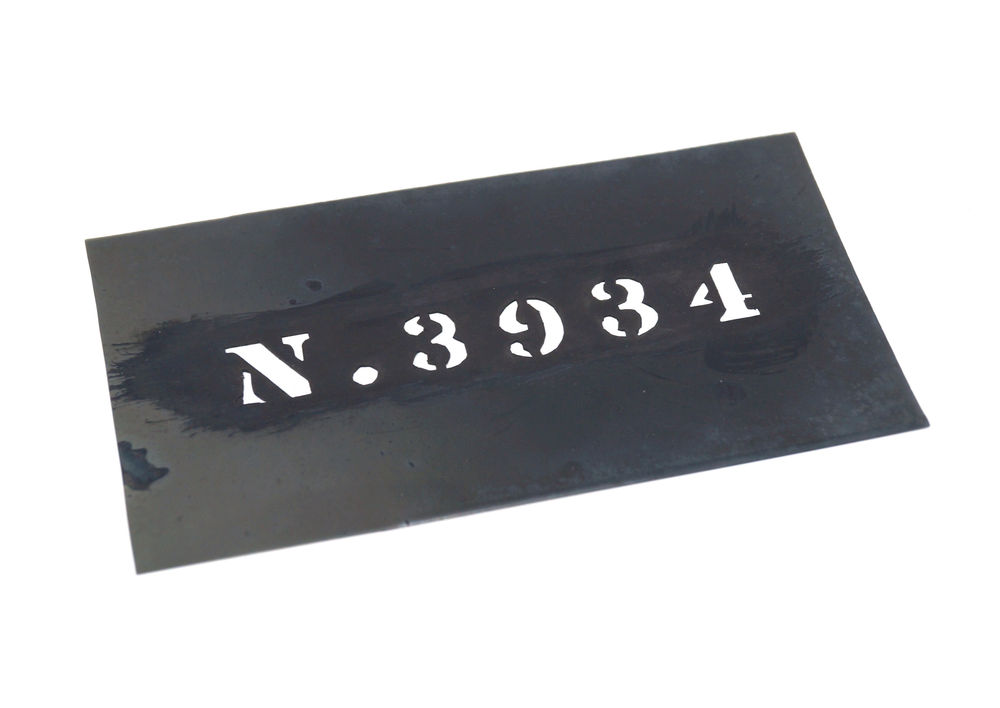
Example of a laundry number stencil, used to apply markings to clothing and equipment. Cut from black acetate sheet, the stencil has been used, as indicated by the remnants of black paint.
This particular example belonged to Technician 5th Grade Michael Nicholas (ASN: 32033934) of the 26th General Hospital.
(Author's Collection)
Marking required: Subject to the exceptions enumerated above and 1 and 2 below, all articles of individual equipment will be marked with the last 4 figures of the Enlisted Man's Army Serial Number (for example, 6046) without addition of Company letters or numbers.
- Articles which, though issued to an individual, are intended for the use of the squad or section as a whole and which, upon transfer of the individual, will be left in the squad or section, for example, grenade carriers.
- Articles issued to a company and intended for the use of the company as a whole.
How marked: As prescribed below, by ½-inch stencil for textile equipment, and by Marking Outfit, Metal, and Marking Outfit, Leather, respectively, for metal and leather equipment.
In case subsequent markings are necessary, the original markings will be eradicated, by erasure and scouring if possible. When eradication is not possible the original markings will be nullified as follows: Markings on textile equipment, by two indelible horizontal lines through each line of the original markings, preferable of the same colour as the original. Markings on leather and metal equipment, by stamping over the original marking with the "dash" die. Subsequent markings, where they cannot be placed over eradicated original markings legibly, will be placed so as to follow immediately nullified original marking, that is, adjacent and to the right or below, as the article best facilitates. In the case of ammunition pocket flaps, the subsequent marking to be placed on adjacent flap to the right.
Spare articles of individual equipment in an organization will not be marked until issued to individuals. Such articles will be used as far as practicable for transfer to other organizations when accompanying individuals.
Stenciling of textile equipment; where placed:
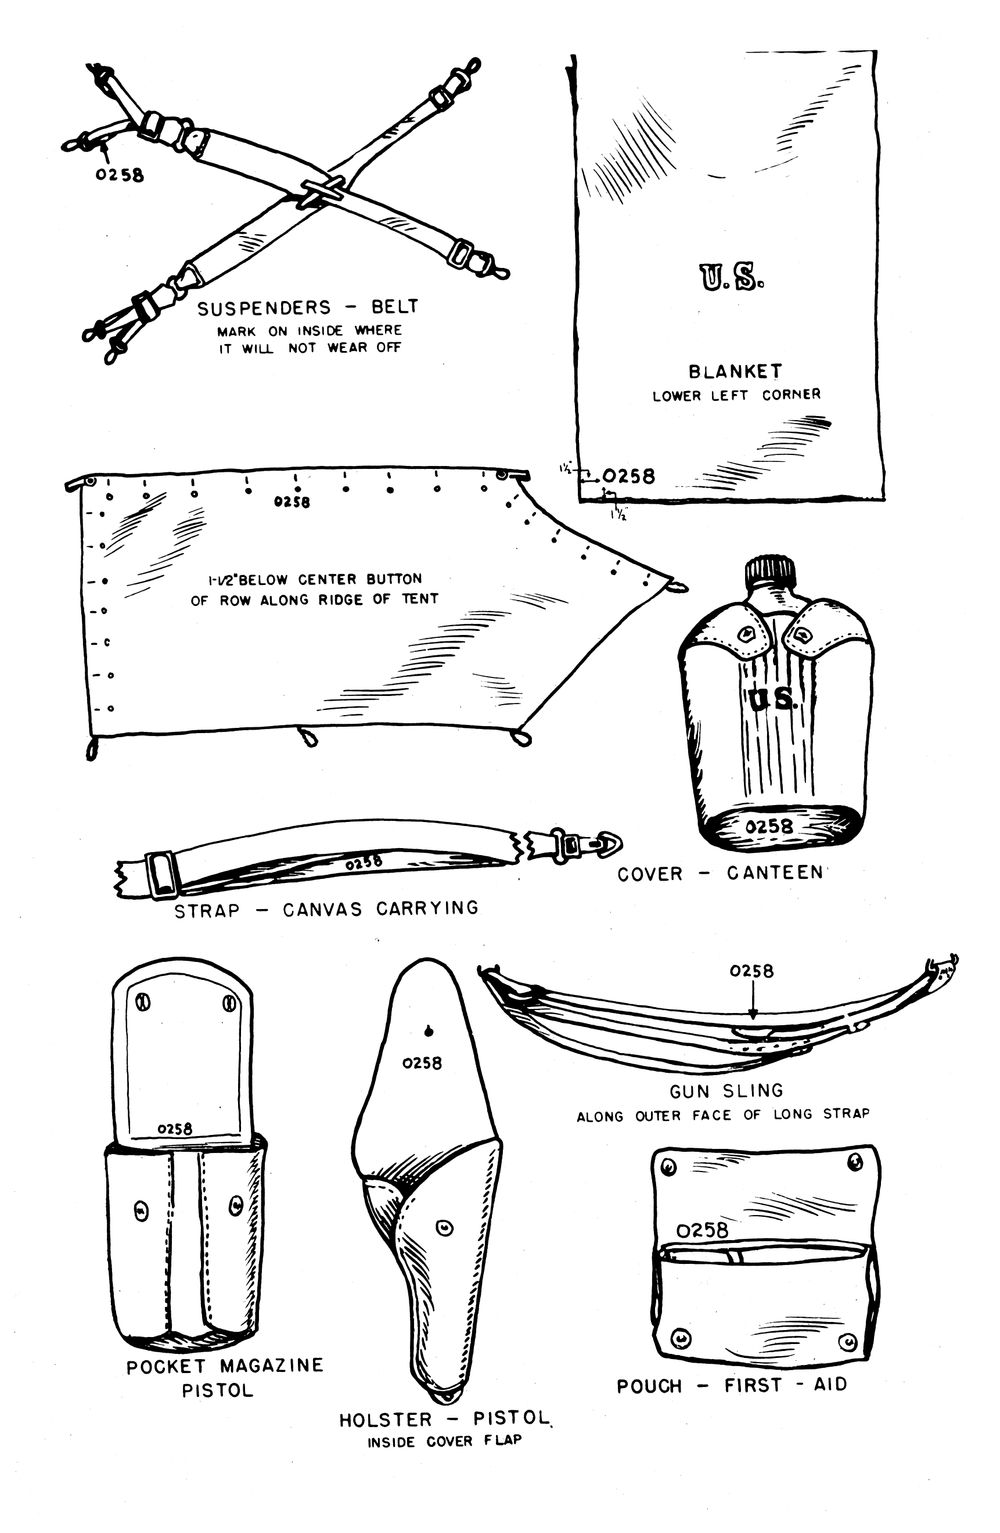
| Article | Location of stenciling |
|---|---|
| Bag, Feed | Bottom to be ½ inch above center of the "U. S." |
| Bag, Grain | Top to be 4 inches below top tie string |
| Belt, Cartridge | Inside of flap of first right rifle ammunition pocket. |
| Belt, Magazine | Inside flap of first automatic or machine rifle ammunition pocket. |
| Belt, Pistol or Revolver | Inside of loop next to end hook. |
| Blanket, OD | On lower left-hand corner, 1½ inches from edges, of blankets marked with the letters "U. S.," and similarly placed on any corner of those without the letters "U. S." |
| Blanket, Saddle | On outside corner, when folded; center to be 1½ inches from edges of blanket. |
| Carrier, Gas Mask | Inside of flap near top seam to right of left eyelet reinforcing seam. |
| Carrier, Grenade, 4-inch Pocket | Inside of flap of upper right-hand pocket. |
| Carrier, Ax, Intrenching | Inside of flap as near left as practicable. |
| Carrier, Pack | Outside between first and second button-holes for coupling strap in one or two lines, beginning on the same side as the "U" of the "U. S." Top of lettering to be parallel to and ¼ inch from top edge of Pack Carrier. |
| Carrier, Pick Mattock, Intrenching | Inside body near lower end. |
| Carrier, Shovel, Intrenching | Inside near lower edge opposite face of shovel. |
| Case, Carrying, Automatic Rifle | Inside of flap near lower edge. |
| Cover, Canteen | Bottom. |
| Cover, Horse | Midway between buckle chapes on near side of cover. |
| Cover, Rifle | Inside of flap near lower edge. |
| Haversack | Inside of flap of Meat Can Pouch near left-hand edge. |
| Pocket, Magazine, Pistol | Inside of flap |
| Pouch, First-Aid Packet | Inside of flap near left edge. |
| Pouch, Medical | Inside of flap near left edge. |
| Respirator | On flap, as near left edge as possible. |
| Surcingle | Inside of strap near end. |
| Suspenders, for Belts, Cartridge and Pistol | Inside of adjusting strap wehre stenciling will not touch clothing. |
| Tent, Shelter | On the same side as buttons, 1½ inches below center button of row along the ridge of the tent. |
By the inside of a flap is meant the inner side when the flap is closed.
Stamping of metal or leather articles: The markings outlined above will be stamped directly upon the articles of equipment enumerated in the following table, by means of metal-stamping dies, as specified opposite each article.
| Article | Location of stenciling |
|---|---|
| Bridle | On headstall |
| Brush, Horse | 1 inch to the right of the "U. S." |
| Can, Meat | On center of handle and below the ridge (with the hinge to the left.) Lid not to be marked. |
| Cup | On handle, immediately below hinge. |
| Currycomb | On back, where most convenient. |
| Fork | Across back of head of handle. |
| Harness | Where most convenient on each major portion. |
| Holster, Pistol | On inside of flap. |
| Knife | On handle to the right of the "U. S." |
| Pouch, Music | Inside flap near lower left-hand corner. |
| Saddle | On near side of pommel, where most convenient. |
| Saddlebag | On center of clip and strap, near reinforcement. |
| Scabbard, Automatic Rifle | On flap, bottom to be ½ inch above strap. |
| Scabbard, Bayonet, M1910 | On outside of leather tip. |
| Scabbard, Bayonet, M1917 | On outside of metal tip. |
| Scabbard, Rifle | Top to be 2 inches below mouth of scabbard. |
| Scabbard, Saber | On side of metal mouthpiece between rings. |
| Sling, Gun | On outer face of long strap. |
| Spoon | Across back of head of handle. |
| Strap, Saber | On strap. |
| Strap, Sling for Automatic Rifle | On outer face of long strap. |
In addition to textual prescriptions provided in AR 850-5, The Office of the Quartermaster General also produced small pamphlets, complete with illustrations to assist troops in applying markings to their clothing and equipment. The digitised examples below are taken from the author's collection, and represent the data contained in AR 850-5 up to Change Number 6 (dated 4 March 1943).
Researching Laundry Numbers
As described in the texts above, Laundry Numbers were not unique to an individual soldier, but rather deemed to be sufficiently unique within the GI's organization. Many collectors are lucky enough to find items of clothing or equipment marked with a soldier's Laundry Number, and often embark upon a research endeavour to identify the original owner of their items. Unfortunately, due to the nature of these numbers, and with a lack of definitive names or full Army Serial Numbers, such a task is extremely difficult. Thankfully, Strictly GI member Ben Major has put together an online database of WWII US Army enlistment records that can be searched using the soldier's laundry number only. You can access this service via the website: wwii-enlistment.com.
While searching for a soldier's laundry number will yield several results, the service should hopefully help to narrow down a search of potential owners.

